The Raspberry Pi never ceases to amaze me. Despite limited hardware, it’s the little SoC that could. I’ve used it as a desktop PC, a media server, and a VPN. It’s the duct tape of hardware, maybe it’s not designed specifically for any one job, but it’s versatile enough to be good enough at a bunch.

Digital Duct Tape
After reading Drew Lentz’s piece on client-side wireless network monitoring, I wanted to see if I could get NetBeez running on my Raspberry Pi. If you’re not familiar, basically, NetBeez let’s you setup wireless network agents on just about whatever hardware you want. But they’ve got a specifically tuned version for the Raspberry Pi. In fact, if you want to get fancy, they’ll sell you a Raspberry Pi in a NetBeez enclosure with everything preinstalled. Seeing this made me think the configuration might be a little intimidating.
The company makes it really easy to get started. Once you sign up for a free trial, they’ll email you links to download the software. Everything comes preloaded on a Debian-based Linux distribution. You have three install options: Raspberry Pi, a virtual appliance, or a Debian Linux package for existing machines. If you can’t find a way to get this running on existing hardware, I’d like to know what your setup is!
For the Raspberry Pi, my process was relatively straightforward. The distribution is the standard Raspbian image familiar to most Pi users. Once you put the image on an 8GB MicroSD Card (I use applePi-Baker for this), it’ll boot into a familiar Linux command line. Notably, SSH is on by default, so change your password right away. NetBeez provides instructions to install and setup their agent, including a secure hash to have it automatically connect to your account. It’s a bit long to type in, but otherwise super simple. Plus you get to use curl.
I was expecting once this is done, something else had to be done. Maybe I’d be presented with another command prompt to do some configuration on the Pi. Or perhaps there would be some kind of UI to move around in. But instead, it just tells you the agent was installed and kicks you out to the base command line.
So I thought I’d log into the NetBeez dashboard and see if my agent was present. I didn’t see it. So I thought maybe it takes a while to authenticate the agent with their servers, so I waited. Two hours later, still no agent. Hmmmmm.
I had my Pi connected over WiFi, since I was too lazy to look for an Ethernet cable in the office. I checked and I was connected to the network, so I hadn’t screwed that up. Flummoxed, I Googled around, and found that their config file defaults to Ethernet. But after editing /etc/netbeez/netbeez-agent.conf, I was able to set it to wlan0 (I used Nano, don’t judge). Suddenly, my Pi was ready and waiting for me almost instantly in the dashboard.

The Virtual Appliance was disappointingly easy to setup
The setup as a virtual appliance was much smoother, so much so that I was disappointed. It didn’t feel like an accomplishment. Just download the .ova file from NetBeez, import it into your program of choice (I use VirtualBox because free). The appliance was setup fine for my network, but your mileage may vary. Then power it up, run the curl script NetBeez provides and you’ll have an agent for you in your dashboard.
What’s nice is that NetBeez provides a free tier that allows you to have one agent and up to three target URLs. While this obviously isn’t adequate enough for an enterprise deployment, it is useful not only for testing, but for small use cases. Right now, I’m using it to monitor the performance of two work sites, and a community radio station site I volunteer at. Small time, yes, but still useful for a small organization.

NetBeez Tiers
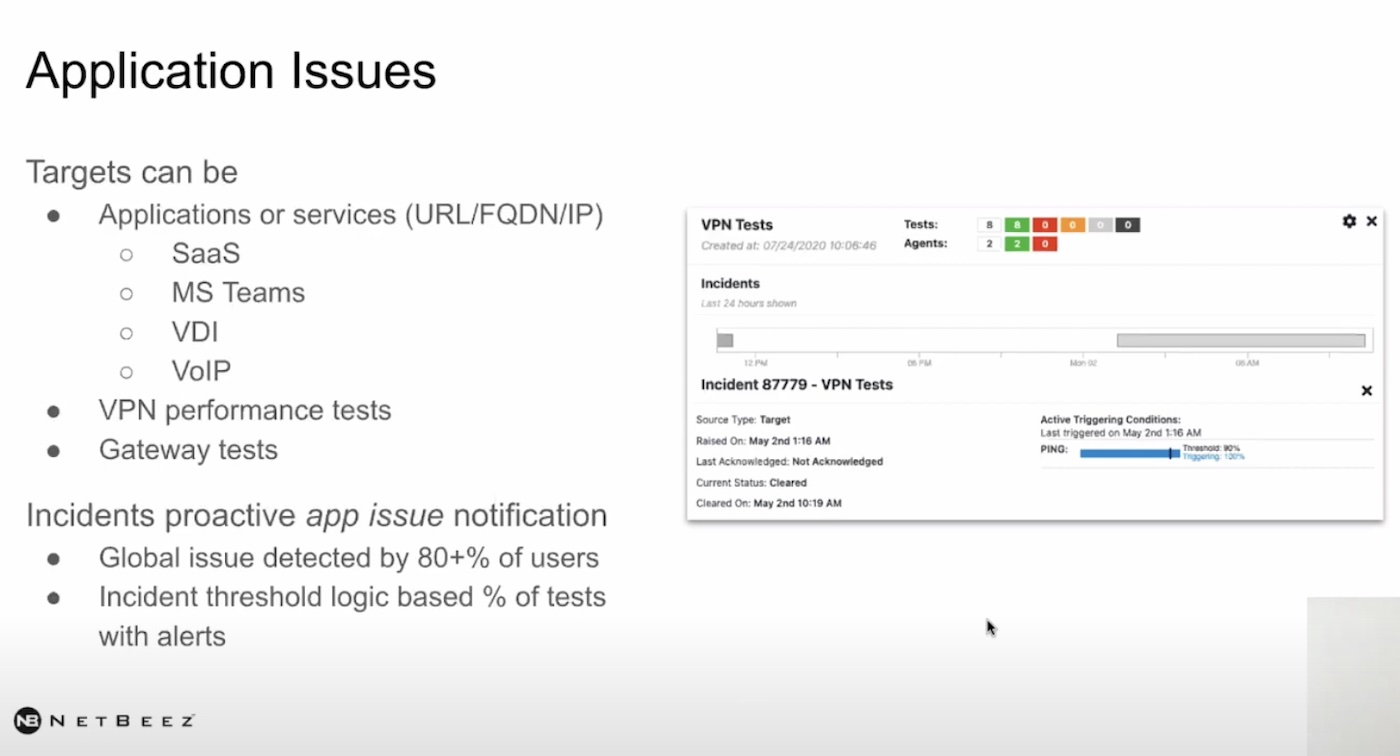
The other nice thing is that NetBeez doesn’t restrict any functionality in the free tier. You may not be able to get the same number of data points as a paid tier with more agents, but it’s still full featured. With your agents, you can run Ping, DNS, HTTP, and Traceroute from one agent to a target URL. On top of that, you can setup speed and VOIP quality tests at given intervals. All of this can be exported to regular reports, and you can get notifications after a specified number of failures.

PING!
The only limitation I found with the Pi itself came on the speed test. After testing on a VM, the IO for the Pi is clearly a limiting factor. Since it runs Ethernet over a USB 2.0 connection, it was limited to about 6-7Mbits per second. The VM was hitting around 12-15Mbits on the same network. Still, for cases where a network is really dropping off, it will show when the speed falls off a cliff.
I could see this being really valuable for campus deployments. The ability to distribute cheap Raspberry Pi’s across a wide geographic area is nice, but with quick deployments, you could also add agents when a help desk receives complaints within a given area. This would allow you to quickly get a picture of the issues uses are having on the network, pinpoint the issue, and hopefully solve it quickly.
Wireless networks are always complicated because you very rarely can completely control the devices connected to them. You can make all of the architecture optimizations behind the access point, but on the client-side, it’s hard to prepare for all contingencies. With the kind of monitoring NetBeez let’s you do, it makes it a little easier to get a well rounded picture. It doesn’t hurt that setup is pretty easy too!