Podcast: Play in new window | Download ()
Subscribe: Apple Podcasts | Spotify | Amazon Music | RSS | More
It seems like any time some storage environment is being carved up and put to good use, there is always 1 or 2 situations where the calculations were slightly off and need to be adjusted. In my situation, this happened on a couple VMFS datastores and our new SAN. However, making a couple slight adjustments to the space allocation on the SAN and extending the VMFS file system was all it took.
Note: These instructions are being made using an EMC Celerra and Unisphere 1.0. Your SAN hardware experience may vary. So, as always, take this as an example and test in your test environment FIRST.
Stage 0 — Determine how much space you need
The mistake I made in calculating some of the space was that I missed a couple vswap files. Oops… So, now I need to expand the datastore by about 3 GB in order to Storage vMotion the VM into place and keep some room for snaps (and whatnot).
Now… it is worth noting that Celerra SANs work with file systems as the base storage level (the base place you can keep data). If you are hip to Unix/Linux environments, you know that when you format a file system, a portion of the storage is consumed by inodes (and other structures depending on the system). So, a 20GB partition is not necessarily 20GB usable. By default, the Celerra is taking 2% of the disk space for whatever it wants. ![]()
Note — I am not an EMC guy, so there may be ways to tweak this. That’s cool.
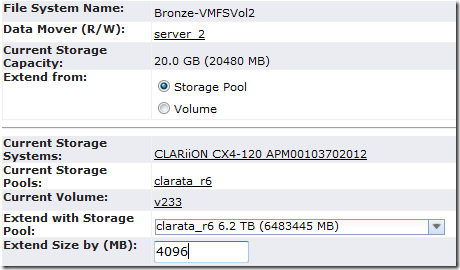
Recall that I need 3GB extra (which would make it a 23GB file system). Extending by 3GB would leave me with 22.6GB usable (again, recall 2% overhead). Extending by 4GB, though, leaves me with 23.6GB usable (377.0MB overhead). So, 4GB it is!
Stage 1 — Extend the file system
Open the Unisphere Client and browse to the file systems. Locate the file system you are looking for.
Right-click and select “Extend”
So… now that we know we need to add 4GB, we just need to do some quick math because the Extend function wants sizes in MB. 1024MB/GB * 3GB = 4096MB. Plug “4096” into “Extend Size by (MB):” field and click OK.
Now Unisphere is showing that the file system has been extended. Pretty cool, huh!?
Stage 2 — Extend the iSCSI Share
Part of setting up the iSCSI access to a file system requires you to define how much of the file system will be used by the iSCSI access. Initially, I wanted all of the space to be used by iSCSI. So, I told the Celerra to use all 20GB (or 19.7GB after the 2% overhead). Now, though, we are still using the 19.7GB even though we have the additional 3.9GB available.
To resolve the issue, we need to extend the iSCSI share to consume the rest of the space.
In the Unisphere client, browse over to Sharing —> iSCSI
Locate the LUN ID of the share you want to extend. For us, this is LUN #19. Right-click on the share and select “Extend”.
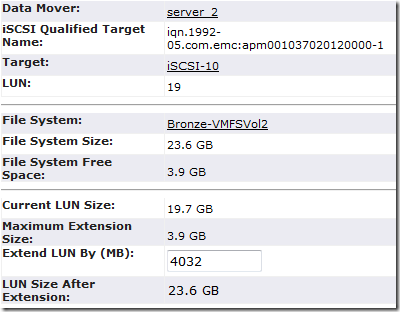
Notice that the size is showing 19.684GB. We’re going to change this now to include the new space we added.
This step contains a little inconsistency in the Unisphere UI that drives me crazy. Specifically, the rounding and display of significant digits. In the graphic above, you see that the iSCSI share is 19.684GB in size. However, notice in the next graphic that we can extend by 3.9GB. Hmmm… What do you want to bet that it is not quite 3.9GB!?
Instead of trying to figure out the exact size, in MB, that we want to extend by, there is a little trick we can employ. The UI catches incorrect sizes, throws and error, and then corrects the error by replacing the value with the largest value possible. So, I am going to enter 4096 into the field knowing that it will fail. However, it will correct my work for me (ah… so nice).
Click OK and extend away.
Now, the Unisphere UI will show that the iSCSI share has been extended.
Stage 3 — Extend the Datastore in vSphere
Even though we have done some pretty cool data storage extension, the vSphere environment is not showing that. Grrrr… Luckily, there is an easy fix for that.
Locate the proper datastore by selecting an ESX host, Configuration tab —> Storage. Right-click on the datastore and select the “Properties” option.
Next, select the “Increase” button
In the following window, you will see a selection of the available devices that we can select to become an extent to the file system. Low and behold, the same LUN #19 has appeared (recall that the iSCSI LUN for the file system was #19!
Select that LUN and click Next.
Magically, vSphere knows exactly what to do with it.
vSphere sees that there is an additional 3.94GB of space available and that the ‘Free space’ will be used to expand the VMFS volume. Click Next!
Click Next to “Maximize capacity”.
Click Finish to begin the magic.
In a mere 6 seconds (for me), the VMFS datastore has been expanded and is available to use.
As a nice aside, this feature will also initiate a Storage Rescan of all ESX hosts connected to the datastore to ensure the change has been reflected everywhere.
Stage 4 — vPat-Yourself-On-The-Back
This procedure to extend a VMFS datastore is super easy. Again, different SAN vendors may have different utilities and procedures for enlarging an iSCSI share on the fly. So, make sure to do you research on the procedure. However, this should go to show that it can be super easy and any VMs running on the store will have little/no impact.


